Eggrotech: A Fragile Anger
Creations by Avril Korman
Octopus’ Garden.

Octopus’ Garden – SOLD.
I always did have an unusual fondness for Ringo Starr songs. This one has been done for a while though I couldn’t show anyone until it had arrived at its’ destination. To be honest the stand took me longer than the egg itself, and needed to be ripped apart six times before I worked out how to put it together for good. This one was intended as a Christmas commission but the stand underwent a bit of scope creep by adding the seahorse. The interior is teal and blue, the holes are ringed in pearl white and the octopus is red and orange.
It’s now safely ensconced in its new home.
So this is 2017.
I know I’ve been quiet for an unusually long time. I got buried under commissions and orders (still am, actually) , I got sick twice over the holidays, and this winter has seen an incredible increase in migraine activity that kept me down more days than I was up. Im starting to dig myself out from under the backlog now, so I am trying to get back into making sure I update here more often. I also need to switch the instagram feed to my eggrotech account rather than my personal one. I’ll get there.
In any case, this piece is done. It’s not as lavender as it appears here (it’s a neutral grey. I’ll show you.) but I needed a very bright light to show that the interior is purple. This is roughly choker length to short necklace length. Proper chokers are hard without an exact measurement and it’s rather it be a little too loose than too tight, obviously.

Quail egg choker – SOLD.
Here’s an image showing the color in natural light and scale.
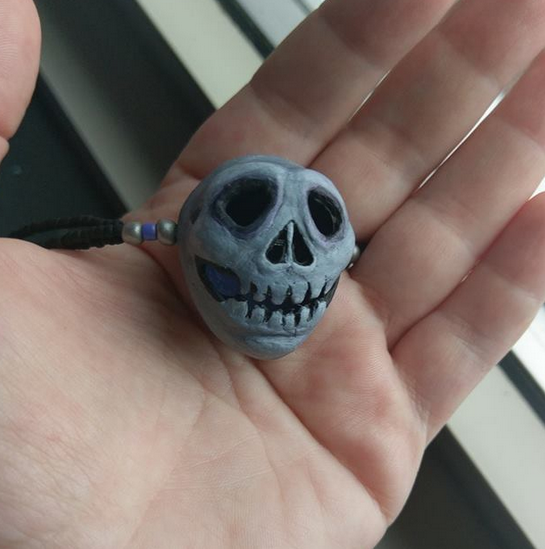
It’s a quail egg, so it’s about the size of a large acorn or a small walnut.
It’s all boxed and ready to go to its new home, and should go out Monday. I also have another piece done, which was also a commission, but I have to edit the images first. Should be ready by tomorrow. I am STILL working on that Borderlands 2 egg (which is just very complicated, though Im on the last bit now.)
Hope everyone has had a great new year so far! More soon.
I get all my best ideas in the shower.
I don’t want to backtrack to how we got here. Because we know how we got here and I’ll be honest. my patience is pretty limited right now. But since Tuesday there’s been a marked rise in hate crimes across a broad spectrum of targets, much the same as there was after the Brexit vote.
At some point after the Brexit vote, a woman named Allison had an idea to wear a safety pin (since they were ubiquitous and inexpensive) to be a visual symbol of literal safety for people likely to be targeted by hate crimes. Though the idea went viral, it was not without fair criticism. It’s also imperfect, because safety pins are… ubiquitous and inexpensive. But it got people talking some,. and far more importantly, listening some.
Since Tuesday the idea has crossed over the Atlantic to the US and has gone viral here too for reasons that no one needs explained to them unless they’ve been living in a biodome or something without contact from the outside world (in which case you wouldn’t be reading this.) Which brings me to my being in the shower.
It occurred to me, as I was standing there trying and once again failing to get the feeling of being trapped in a house with a pathological narcissist off my skin, that one of the problems with the safety pin thing is that it’s a meaningless gesture unless there’s some other thing behind it. Some other help besides pinning a pin to your jacket, especially if you’re the kind of person who tries to avoid conflict when it happens (Don’t look at me, I’ve never been that person, but a lot of people are.) It then occurred to me… wait a minute. No one raises charity money the way I do, what am I STANDING HERE UNDER THIS WATER FOR? I quickly finished up and went straight to my sketchbook.
See, I have an unlimited source of quail eggs. I use them to make skull egglaces.
I began drawing very quickly. What if I used them to create necklaces that incorporated the pins, customized of course because that’s how I roll,. and then donated a chunk of the proceeds to charities designed to help the people who have been targeted? People get jewelry with the pins on, charities make money, and people talk some and listen some.
Here’s the quick sketch I drew, though this is just an idea, there’s infinite ways to do this:
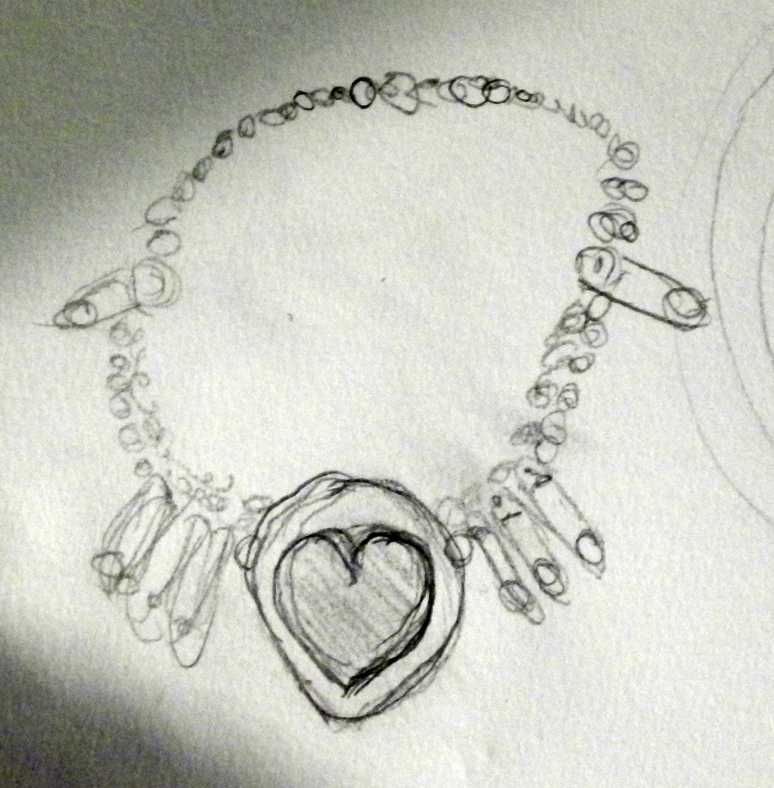
It doesn’t have to be a heart carved in, it could be basically anything. It doesn’t have to be that pin number or placement. It could even have the pin dangling from or attached to the egg itself.it can be any color or bead combinations. Any and all variations are possible on this. And so too are the list of charities, from things to help immigrants, to charities to help GLBT kids, trans* charities, NARAL and Planned Parenthood, and so on.
Normally, I sell skull egglaces this size for $50+ $10 shipping (extras like, special beads or whatever are a little extra. ) Just so we’re ALL giving, I’ll leave the price the same, and send 20% of the proceeds to charity. I have a HUGE list graciously provided to me by my friends, but if you have one in particular that YOU like, just tell me which one it is. Long as they take online donations, we’re good. You can use the skull egglace order form (just choose a quail egg and explain that it’s a safety pin egg in the comments — I’ll get back to you and we’ll customize your design. When we’re ready, I’ll throw an order up to the etsy store so you get the benefits of their buyer protection program, and I will cheerfully show you proof of the donation to your charity of choice.
Only one thing, though. Only do this if you’re going to not only wear it, but actually speak up on behalf of people who need your help AND if you’re going to listen to them too, so they can tell you how best you can help them. This thing only gets you some jewelry and a small charity donation. It’s not magic, and it’s not a panacea. You have to do the rest, and it’s a hard and important job. K? We good on that?
Im a little snowed under right now working on 2 commissions and getting ready for the world’s tiniest craft show in December, but I promise to make these as much of a priority as I can. As always, lead time for egglaces is *about* a week, depending on complexity.
Stay safe, everyone.
Into the Borderlands.
So this month I have two things to do.: 1. Make some eggs for the world’s tiniest craft show in December (Im already regretting agreeing to do this.) 2. a commission for an egg based on Borderlands 2, a game that to the surprise of precisely no one reading this, I know less than nothing about.
- the challenge is that I have no idea what to make. I just have no real feel for what people might want at one of these things. This is a problem considering how little time I have to make about another 10 of them.
2. This thing is going to take me forever to paint. It’s out of the bleach now, but I have a lot of painting ahead of me I’ll post some photos after it’s dyed since right now it just doesn’t look like it makes much sense.
Meantime, please go buy stuff! The etsy store is right here.https://www.etsy.com/shop/eggrotech?ref=hdr_shop_menu . Id really appreciate it.
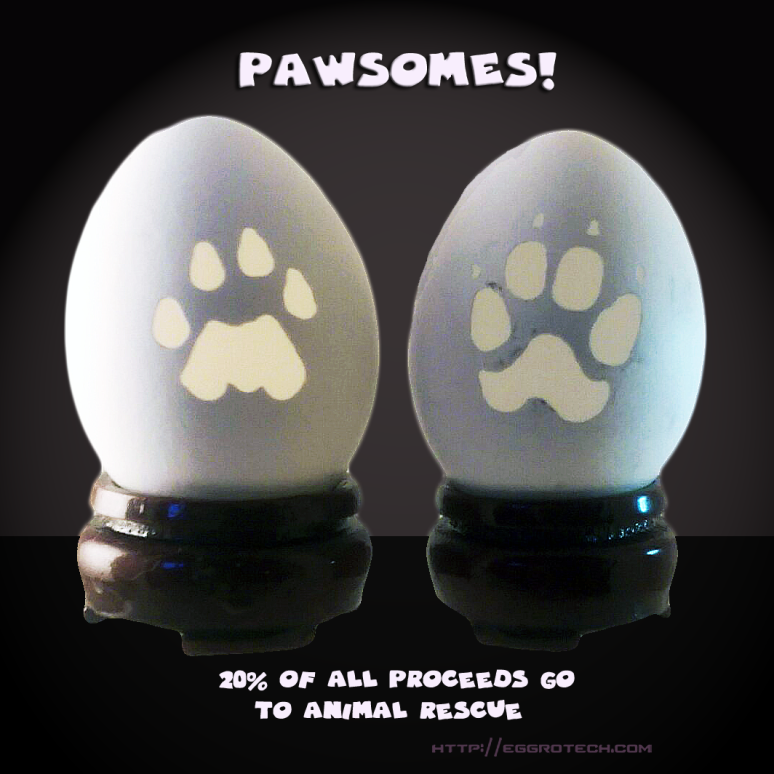
Pawsomes.
I have done a lot of charity work over the years. I mean, a lot. I’ve helped raise money for charities large and small all over the world. All different kinds. While I’m happy to do all of that, and will continue to do so, every so often people have asked me what *my* favorite charities are. Me, personally.
The answer is always, 100% of the time, animal charities.
So a close friend suggested I create a way to incorporate that into my eggs. So I have. Basically, I can carve any animal print onto an egg, and then you can choose any options you like. I can even paint it to resemble the colors of your own pet. 20% of all proceeds will go to animal/wildlife charities, and I will happily provide proof of donation. Do you have an animal charity you’d prefer your donation to go to? Tell me, and I’ll give it to them. Anywhere in the world, as long as they take online donations. Not sure? I’ll find one.
The only real rule is that the only carving on the egg will be the paw. (this allows me to carve them quickly.) I can make them into ornaments for an extra $10, if you want something to hang on a tree. I can even make it into an egglace. Just fill out an order with whatever you want here.
Together, we can give a little bit more to help the animals we love so much.
The Flower of Possibility.
Sometimes you have to let things be what they are.
I was still thinking about how to work with the flaws in things after I finished that last egg. For about six weeks Ive had a carved egg blank here, that had broken during carving. Not enough to toss it, but in a way that would be easily fixable. I’d had it in a cup on a shelf, while I considered what to do with it. But after the last egg, I finally realized that I wanted to use the break in the design to create a bud vase.
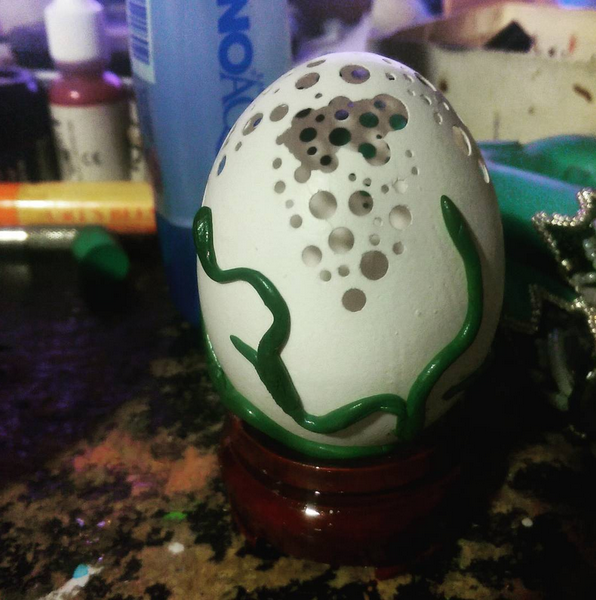
I was pretty excited by the idea, and could see the entire finished piece in my head. Unfortunately, my head was also full of a combination of cold and allergy medicine. To put it bluntly, I was high as a kite.
About five minutes after I took this photo, I dropped a tube of MonoAqua glue on top of the egg, shattering it into a zillion pieces and killing my bud vase idea.
The original pattern was a basic pattern #3, so I made a new one. This second one didn’t break under carving though, so the original idea I had for the bud vase wasn’t going to work, and it didn’t seem like a good idea to deliberately break the egg just to create the same effect — the beauty of it was in its accidental nature.
That said, I really liked the sculpting I had done on the first one. I decided to just sculpt and see what it turned into. The resulting piece is The Flower of Possibility.
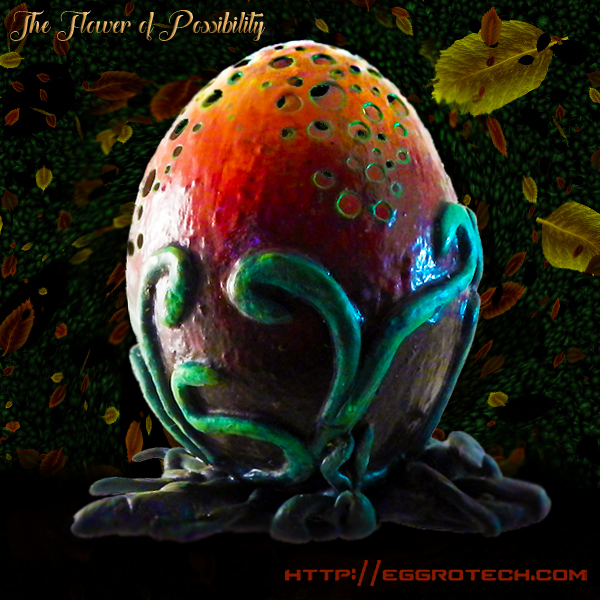
The thing is, I don’t know what it is. Is it a beautiful flower? An alien life form? A triffid? I don’t know. Right now, it’s a possibility, and it can be anything you imagine it should be. Maybe it’s just a visual metaphor for an idea that hasn’t quite formed yet; an object to remind you that the power of possibility is strong in everyone’s life, and you get to direct that possibility into being. It’s a beautiful mystery that you get to solve.
This is a jumbo egg, and both the interior and exterior have a gradient pattern that goes from deepest red black to metallic gold on the top. The holes are lined in a bright leaf green and the base is a mixture of greens and autumn orange, with black and black cherry red. It doesn’t need a separate stand- it will sit up just like it is on its own.
It’s available for $125. Not a bad price for a wonder of infinite possibility. You can grab it from the Etsy Store.
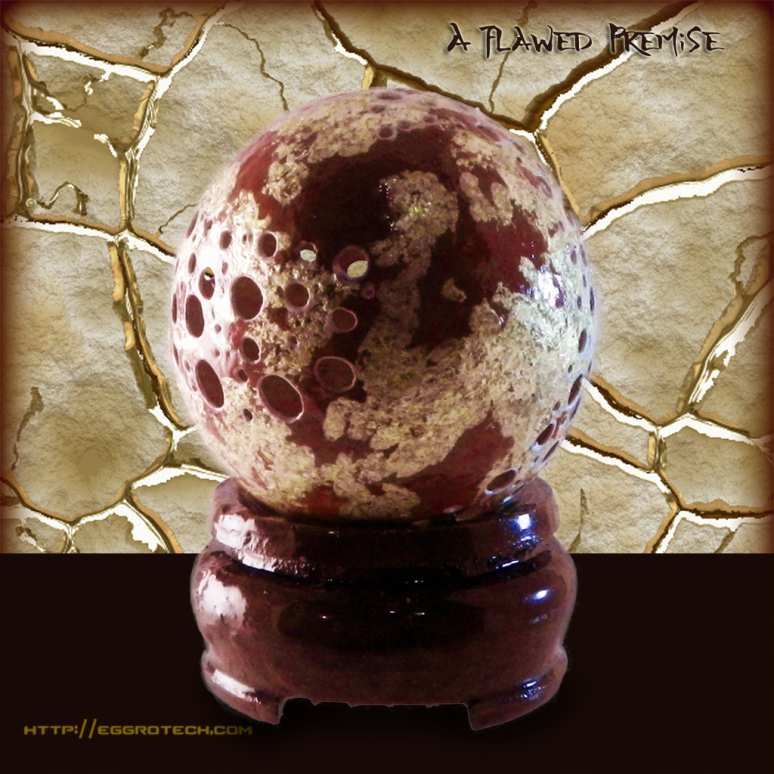
A Flawed Premise.
“I myself am made entirely of flaws, stitched together with good intentions.”
― Augusten Burroughs, Magical Thinking
Some eggs have more of a story than others. Sometimes they seem to be trying to teach life lessons. So it is with this one.
I spend a lot of time trying to get my eggs to come out perfectly. Let’s face it most of us try to do that in most aspects of our lives. Sometimes it’s possible, sometimes it’s crucial (like in surgery or something) and sometimes, it’s just never going to happen – and that last part is very often true of art or design, or architecture or any creative thing. It’s even more true when it comes to anything involving humans and how they look or react and behave.
This egg started out pretty normally. It’s a double spiral basic pattern, that I had intended in doing in red and white, with a gold interior. Nothing too fancy. I figured someone might want to make an ornament out of it or something. But I must have over acidified the dye (this happens once in a while) and as a result, I was having real problems getting paint to adhere to the exterior. Parts of it would stick, and parts would just flake off. I tried coating it over and over again, but no matter how many times I tried to fix it, there were just sections of the exterior where paint was simply not willing to stick.
So I decided to work around the problem. I have some 22K gold leaf (real gold) here, and instead just used that to fill in all the areas to which paint would not adhere.
Things got even stranger when I realized that the shell was so thin, that at some point while I was working on it (I was on a lot of medication, since I’ve been sick) that I must have broken a small piece near the bottom. This also sometimes happens and usually I restore the break flawlessly – you can’t see it when it’s done (I have a degree in this,. so.) though I call it out when listing them because that’s only fair.
I considered tossing the whole thing, because I was sick and cranky and just over it. I let it sit and was looking at Instagram, where I ran across whatever photo @skelotim had up at that moment (he’s seriously my favorite thing on instagram. No lie.). I had a WWTD (what would Tim do) moment, and realized, he’d suggest embracing the flaws, because he’s all about that. So I went back to work.
I did repair the flaw, but it is still visible if you’re looking for it. This was a conscious decision, and here’s the flaw:

If you look closely on the left side of that circled area you can see that it’s ever so slightly raised. The truth is when it’s in the stand you don’t see it at all, but if you’re holding the egg in your hand you can see it if you rotate it against the light at the right angle. As I said, it was a conscious decision- by that point I was all about working with, rather than against, the flaws in the piece.
There’s an old tradition in Japanese ceramics called Kintsugi. Philosophically (and practically), it’s really quite beautiful. Instead of restoring something to hide that the damage ever occurred, it highlights the problem areas using metallic powders mixed with lacquer as a binder and shows off the flaws as part of the beauty of the object. Do an image search, it’s really nice.
I’m not Japanese, and this is not a ceramic object (though from an operative standpoint it’s pretty similar), but I think this is sort of in the same spirit. Once I decided to stop fighting the flaws and just highlight them it all came together really quickly.
This is a jumbo egg. The interior is gold (non-metallic) and the exterior is red with 22K gold leaf (real gold, as I said.) The holes are accented in pearl white.
Originally I was going to let this one go for $100 but because of the flaw I’ve knocked it down to $60. I can also leaf the stand if you want for an extra $15. I’ve put it up on the etsy store.
Here;s the egg from all angles, as usual.:
I am still getting over being sick, but should be more or less okay by Friday. Go buy things.
Sleigh Ride
So as I type this, I have a fever. I have no idea how I managed to finish this one up as fast as I did, but it’s done.
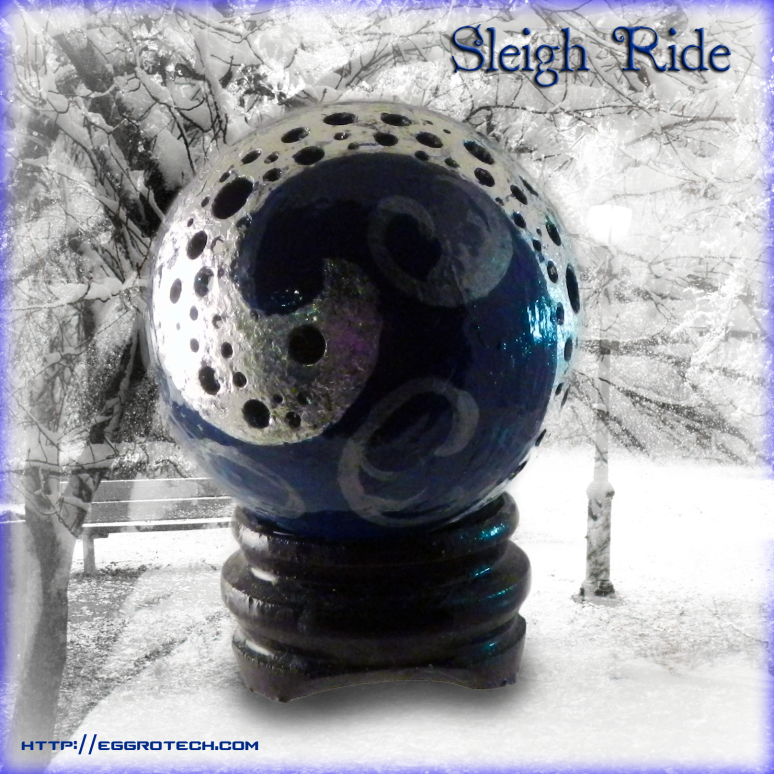
This is a basic pattern egg (single swirl) that I used to get a jumpstart on winter (which I never do, Im always behind.) It’s a jumbo egg, with a midnight blue interior, and composite silver toned leaf on the swirl. The negative space has a simple pattern in a semi transparent pewter over midnight blue, with a glossy finish. It’s the kind of thing that would look nice on a tree or a Hanukkah bush or hanging wherever you hang all your winter stuff and things.
Also, I can make this one into an ornament, if anyone wants it that way. Otherwise, it comes with a stand (but not THIS stand- that’s my work stand.)
I have it up on the etsy store, if anyone wants a jumpstart on their winter festivities.
There’s another egg coming very soon- it’s about 3/4 done, but Im running behind due to being sick. Hopefully, by Friday,
Here’s the egg at other angles:
Inspiration whilst contemplating my slippers.
Before I get into this post, I just wanted to thank everyone for their wishes on my oral surgery. The truth is this was easily the best dental experience of my life. Why? Because they knocked me out. I had an appointment at 10am, they took me at 11am, and I was home, with my drugs from my pharmacy cross town, by 2.
My recovery pain can be described as a 1 on a scale from 1-10. I took one percoset after the novocaine wore off, right after I got home and had to eat. I took 2 ibuprofen in the first 24 hours, and since then no pain killers whatsoever. Nothing. I haven’t needed them at all. I had three teeth pulled- two wisdom teeth and a secondary molar. All on the same side of my mouth. I have no swelling, no trauma, no horrible memories, no nothing. They put me out, which got me out of their way, so they could just do their job without having to worry about how anxious I was, and as a result I have no horrible after effects. In fact I ate normal (not crunchy, but normal) food this morning. No pain, though I did eat slowly and kept the food away from that side as much as I could.
So, if you need oral surgery? Tell them to knock you out. Trust me. It’s an *entirely* different experience.
So, about my slippers. For weeks now, I’ve been struggling with a display solution for the eggs to be used at a show in December. I had a specific vision for how I want the end result to look but it was going to require a custom solution – one I was struggling to obtain. Either the custom foam places *couldn’t* do it, or they couldn’t do it in a small enough quantity to make the idea viable. I had pretty much decided I was going to have to abandon the idea and go with my second choice. I wasn’t really thrilled about it, because the second idea had issues that the first one didn’t, but there’s only so much I can do. After all I am all about trashing ideas that just won’t work.
The thing I was originally looking for was this:

You’d think this was simple, but it’s not. Sure, I can get hollow cylindrical bits of foam, but what was problematic was the sizing. I needed a 1.5″ hole in the middle, and I needed the foam pillar to be no less than 5″ in diameter, and preferably 6″. People were suggesting things like pool noodles and foam grips, but it quickly began to become frustrating, as the dimensions are specific and both of them actually matter- the center hole has to be enough to hold an egg without allowing it to fall through, and the overall diameter has to be wide enough to create a pillar that will hold up not only under the weight of the egg itself, but be wide enough to be stable on a table without being easily toppled over. In the end, I was thinking I was going to need to abandon the idea, because I couldn’t find what I needed in the quantity I needed. (One place would do it if I ordered 72′, but I only need about 12′, cut into varying lengths. I was really not happy about any of this, as displaying the eggs is not only important, but keeping the eggs safe in a place not entirely under my control is one of the very reasons I don’t do shows in the first place.
I also have the chance to vend at the Bronx House Holiday Market. Im considering it, but I may hold off this year just to see how this other show does. I am really not comfortable doing shows at all – even doing one is a big thing for me, so i don’t know how I feel committing to doing two.
But I’ll think about it (and if you think I really should do it, especially if you’ll go and buy things, let me know.)
But about my slippers.

Now truth be told I don’t like this style of slipper as they tend to fall right off my feet. I like the ones that go all the way around. But what I do like about these is that they’re made of memory foam. It doesn’t solve the fact that I walk out of them, but it does make it happen a little less often. I was wearing these downstairs as I was doing the laundry, and I was contemplating the wonder that is memory foam. And as I’m shuffling along, I realize…I don’t actually NEED a hole in the center of the pillar. What I need is memory foam. All I have to do is prep the foam so that a weighted object of the right diameter leaves an impression in the foam that will hold the egg in place.
That just made my search a lot easier. Because getting a 6″ foam cylinder cut into varying lengths is WAY simpler than getting one with a hole in the middle. The only question now is if I can get it in a color I can live with. Painting memory foam is problematic because it’s so dense. You can’t really paint it. However I might be able to find it in grey, or barring that, dye it in whatever color I like. Sadly, I don’t sew, so making 25 custom covers for varying lengths is not in the cards, though I may be able to cover just the sides and leave the top, as long as it was dyed a coordinating color. But I think I’ve found my solution there. All because of the wonders of memory foam.
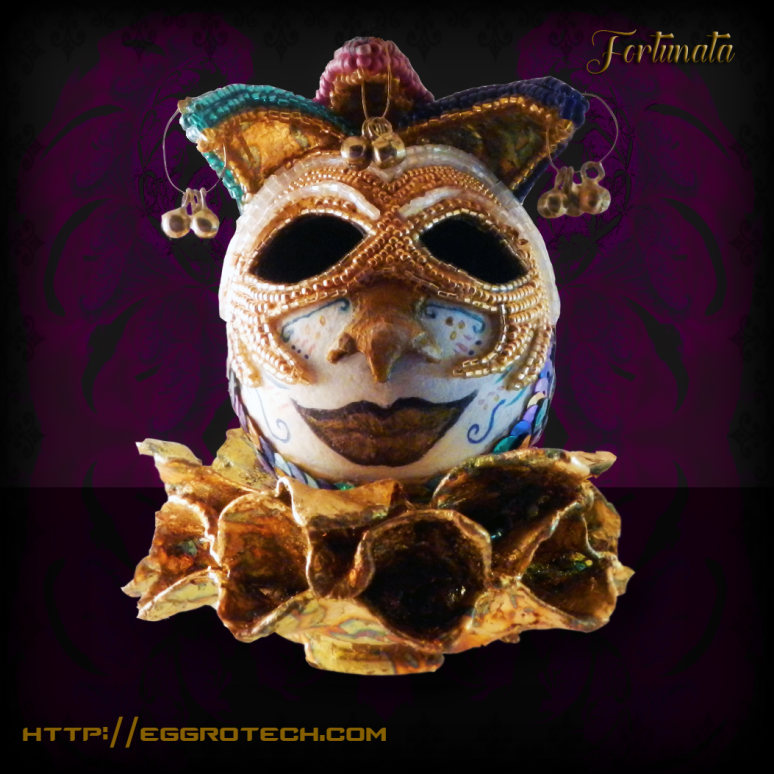
Fortunata.
So I have oral surgery tomorrow. I have no idea how I’ll be feeling afterward, so I wanted to do my level best to get this egg finished before I got drugged to the gills. I didn’t think it would actually happen, but the stand came together more quickly than I imagined. Though my original intent was to add beads and sequins, once I got all the leafing done, it just seemed like overkill and that the leafing by itself would be plenty. So it’s finally done. Honestly it went pretty quickly. I think it was a little less than 3 weeks, including a lot of drying time.
Fortunata – Not for sale.
This is the most elaborate egg I’ve made to date. It has carving, sculpture, beads, bells, sequins, paint, dye leafing. It’s a rather large jumbo egg (I chose it for the shape) with a charcoal/black interior with a bit of gold lustre dust (not really all that intentional, but it looks cool.) The leaf is composite, so it has a lot of colors in it, but obviously mostly gold. The exposed egg surface is finished in a dead matte varnish. All the bells are 4mm anklet bells. I have photos from all angles as usual, but if you have any questions on how it was made, please just ask!
This egg already has a home and will be headed down south, but if you want one like it, or even like something else, just fill out an order form, or for something already done, head over to the etsy shop. I’d love to come back from my surgery to some new orders, so have a look.
Next up, how I solved my foam problem because, slippers. I swear, that makes sense eventually. See everyone Friday. 🙂
Sometimes, you really do have it right the first time.
The egg itself is done now. I’m going to be working on the stand for a few days, though. But before I put the egg aside for the moment, I want to talk once again (it’s a running theme.) of how important it is for designers and artists to be able to look at something and say “nope. ” and toss it if it isn’t right.
After I beaded the mask and trim on the egg, the only thing left was the nose. I had wanted to bead that too, as a kind of nose piece attached to the mask. At first, I did the beadwrk in the same gold beads as the mask, but it just didn’t look right- there was not enough differentiation between the mask portion and the nose. So I tried a second time, and used a darker, more bronze colored set of beads. The beading on the nose was tricky due to the shape and took about 8 hours to do. And so help me, I finished it, took a single photo and ripped every last bead off, because I hated it. In the end, I left the nose without beads, and used a gold/black paint wash to create some shading and a gold/pearl wash to create a highlight and left it at that. Part of the issue is the egg design itself is not perfectly symmetrical. the nose is slightly off too, in a way that’s “natural” in the sense that no one’s face is completely symmetrical, but a pain in the ass when you’re working on artwork. It’s also not asymmetrical in a way that I can easily fix, as this portion of the egg is unsupported by a larger framework. I cant mess with it too much or Im going to shatter the whole thing. So I’m just going to have to live with it.
I also decided to coat the “blank” parts in a dead matte varnish. I considered a gloss, but the beads are already so sparkly and shiny I thought it needed some contrast.
Anyway, here’s the one shot I took with the bronze beads vs. where we are now. These are process shots so they’re just quick and dirty, but you get the idea.


The beads on the nose were a) a distracting, thogh similar color, b) made the nose look disproportionally large, and c) accentuated the fact that it’s wildly asymmetrical.
I still have a lot of work to do on the stand. fortunately, it doesn’t matter how rough the ruffle sculpts are. First of all most of their volume won’t be seen (there will be three stacked on top of one another so you’ll lose most of the volume visually toward the interior, so IDGAF how rough they are) and b) because they’re meant to mimic crinkled fabric anyway. and c) they’ll be covered in so much stuff it just doesn’t matter. The larger problem is the fact that though they do have a wire on the interior circumference (against the stand) they don’t have one at the outer edge, so I have to babysit it until it will hold its shape without collapsing in on itself. That takes about 90 minutes per ruffle, and I have to do them separately so they don’t stick together. It’s a time sink, but not really difficult.
However the stand itself will likely take the bulk of the week. Fortunately, it’s t a stage where I can move on to other projects, so if you were waiting to place an order or buy something from the shop, now is a good time.
Also, if you don’t follow me on any of my twitter accounts, you probably don’t know that on Friday I announced a new way to get free eggs. (that wasn’t a typo.) Head over here to read what that’s about.
Finally, I was asked a couple days ago if i take payments. yes, of course I do, don’t be silly. I totally understand the desire to buy a thing that you can’t shell out for all at once. Just contact me at eggrotechNYC@gmail.com and I’ll sort out whatever we need to do.
Though normally I’d try to update again on Wednesday (Im really trying to update three times a week now) I have surgery Wednesday (oral, no one panic.) and I really doubt I’ll be able to do that until I’ve rested, as Im being put under general anesthesia to have it done. (before anyone asks, two wisdom teeth and a secondary molar.) So I’ll see everyone after I get back from that. However, I can start any orders placed before then right away. No problem.
Hat Trick.
I finally finished the hat on the carnival clown. I’m working on the mask/face now, but I want to talk for just a minute on how to best attack the problem of ornamenting curving shapes (and give a news update too.)
So, the issue with the hat on this egg is that the shapes are not only affixed to a curved surface, but they curve themselves in their own ways, and interact with one another to form odd angles and tight curves. Here’s the hat just after it was sculpted:

. Now, I took this shot before I had even put the egg in the bleach, so that explains the ragged look around the eye holes. First of all you should know those little hat fronds have a wire armature to help keep them up while they cured. If I hadn’t done that, they’d have collapsed under their own weight before they would dry and hold their shape on their own. So each of those little fronds has a triangular wire armature that’s allowing them to hold their shape during the curing process. They’re not entirely uniform, and that’s largely because they don’t have to be. In the end, the differences between them are minor, and won’t matter once the whole thing is covered anyway. But most importantly, you’ll see that the interior shapes of each one are a little different, and the one in the middle presents its own problems, because it’s behind the other two and therefore has a tight space between where it ends at the base, and the back side of the other two. This created a design problem if I wanted to completely cover the hat in beads.
What I decided in the end was to use composite leaf on the interior curves of the fronds, and just use gold beads on the edges of the interior side. This is an active design decision, but it’s done with common sense physics in mind – the interior curves aren’t uniform. It would be impossible to create an interior beaded surface in which the beads all aligned in a way that wasn’t a complete mess on that middle piece- there’s just so little room to maneuver in there and the angles are complicated by the presence of the other two pieces.
I sort of approached it like I would an upholstery project. Just like one of those, it’s the edging that pulls it all together. and in fact, the beads when applied with that in mind, really do make it look sort of “padded”.
You can see- it’s the edge beads that make it work.


When I prototyped how the bells would sit I used just a bit of twisted wire, but for the end product I used crimper beads that I then threw some composite leaf on (I only had silver ones here and this was a faster solution than buying a whole gold pack.) They give a more finished appearance to the final version of the hat.
The beads themselves are applied with a long beading needle and thread. I put a whole row on a strand, and then lay them down. I allow the glue to tack up for about 5 minutes, then carefully, while holding the first and last bead in the row down, pull the thread out slowly, leaving the beads behind. This allows the beads to remain in alignment in any shape I give them, but unfortunately isn’t useful in cases where a bead pattern is interrupted by another one (like in that Miami Dolphins egg with the number on the back.) In a case like that, I mostly have to lay the beads one at a time.
Bottom line, is when one material won’t work due to space or angle limitations, you can always find another that will. However, if you choose to use leaf (of any kind) it’s good to have good leafing technique. I was trained on how to do real leafing (both oil and water gilding) but the kind of leaf I use here is stuff anyone can use, if they don’t rush and always follow two simple rules: don’t rush the size (glue) and wear cotton gloves. Yeah I know the cotton gloves make you look like Mickey Mouse but they really are important. The oil on your fingertips will absolutely cause the leaf to stick to YOU rather than the surface you’re trying to lay it on, so it’s key not to touch it directly. Further, depending on what kind of material is in your leaf, you’ll get oxidized fingerprints in your leaf as it ages if you’re not careful. So it goes like this: paint your surface. For warm based leaf colors I recommend a red (so generally speaking, throw red paint under gold leaf) and for cool based leaf colors I recommend a blue. For copper leaf I actually tend to use a green because that creates patina effects. Let it dry completely. (this is important.) Then paint a thin layer of size (glue) . THIN. You don’t want puddles. You want it to be a uniform, thin layer. Then walk away and don’t touch anything until the size is clear. (It will go on a milky white.) once it’s clear, it’s tacky to the touch. If you have to test it, use a knuckle. Don’t use a fingertip. You can then wear your cotton gloves, and apply your leaf with either a gilding brush (for a whole sheet) or with a fluffy paintbrush if you’re just using flash pieces like I did here. Tap it down gently, but firmly and then if you need to burnish (polish) it later you can do it once it’s down and dry with a burnishing tool.
In the end, this is the final version of the hat:

The hardest part was the one row of gold beads at the very base of the interior of the middle frond. That was, to be fair, a giant pain in the ass, since those beads had to be laid by hand and there’s just no room in there to maneuver them in to place very well.
As I said earlier, I have to do the mask and face next.The mask will be done with three kinds of gold/bronze beads and the white parts on the mask will be done with pearlescent white tube beads. As you can see, the stand is already being prepped to create a custom base, but I won’t get to it until I don’t need the stand while I work anymore. It will eventually be turned into a neck ruffle.
Again, Im strongly considering doing that show in December, so I may make a couple of similar, but different ones to this one to bring along. If you want to help support that idea, please buy one of the eggs I have in stock , or order a custom egg or egglace here. I’d really appreciate it. It’s very hard to decide to do this show, but everyone’s support makes it easier.
Im hoping to update with some brand new ideas on Friday. See you then!
Seeking the next level.
No matter what you do, you’re always looking for ways to get better at it. A lot of that just comes with simple, repetitive practice, but sometimes it’s an active choice– a series of decisions to do something difficult for the sake of forcing yourself to get better at whatever you’re doing.
That seems to be a theme for me recently. Those quail eggs carve quickly, but because they’re so small, sculpting them takes a while, since you can’t find a way to easily hold them while you’re doing it. I made jewelry for the first time, and then radically improved upon how I do it. I got lightning fast at making basic patterns. And most recently, I’ve been working on a really, *really* elaborate egg.
The egg isn’t finished yet. I think it still has a week left in it. A lot of this is glue setup time. I can only lay down so many beads without letting the glue really take hold before moving on. Not waiting long enough causes the beads to float out of position on the wet surface. So it’s two rows, wait… two rows, wait…. The actual beading itself is challenging because the surface curves in multiple directions at once. The sculpted shapes are more elaborate than usual, and I’ve used a bunch of metal leaf (I own 24k leaf but this is composite.) and hand laid hundreds of sequins(there’s gotta be a better way than how I did that, but I’ll figure out what it is eventually.) Ultimately, this is an exercise in expanding the limits of the top end of my product line. But this is what I have so far:


As I said, it still needs work. I am still working on the center portion of the hat, which is a complex issue due to the bead pattern and the shapes involved. However, the inner side of the hat is leafed with composite, which gives it a nice swirling color effect against the gold. The bells are 4mm tiny anklet bells, and they do jingle. Once the hat is finished I have to move on to the mask, trim and “brows” and start sculpting the stand out further. The bag of popcorn (rice or beans or any other dried thing like that would be fine too) is there to hold the egg in whatever position I put it down in, so it doesn’t roll. The stand really only holds the egg effectively in one position, so the popcorn bag will hold it in place at odd angles that I need to apply beads so they don’t slide off the egg’s surface.
So in addition to all of this, Im being encouraged to put my eggs in what would be my first craft show in December. I normally avoid this sort of thing pretty hard. First of all, transporting the eggs is a pain in the ass. I mean just, full stop, it’s just a hassle. Second, because I am exactly the opposite of the person who wants to be in that position. Im really introverted, I am uncomfortable in situations like that, I present as *really* awkward, and I have to constantly watch out for the eggs in a situation I don’t fully control. It’s exhausting. But the biggest problem isn’t any of that. It’s that display solutions are *really* hard to do in this situation. Putting them all on egg stands on a table is so terrible an idea that it’s not worth considering. However, the idea I DO have and would work effectively, has proven to be REALLY hard to make happen. I would need some custom pieces of high density foam cut to order. Yes, I know there’s oodles of places online that claim to do this. So far though, none of them have been able to do what I *actually need done*, which is to take a 6-8 foot length of cylindrical foam (think like a bolster, something 4- 6″ in diameter and cut a 1 1/2″ hole in the center, and then cut the whole thing crosswise at various lengths, between 3 and 1o inches in height. Basically you wind up with something like this:
(the color doesn’t matter as long as I can paint them.) No, styrofoam won’t work. No, foam grips won’t work. The walls need to be thick or it becomes a toppling risk. They need to basically look like pillar candles with a hole in them. I’ve contacted several “custom cut foam” places and no one can do this (except for the one really nice guy who CAN, but only if I get 72 feet of it. Which, seriously, I don’t have anyplace to put, and wouldn’t have a use for anyway. I just need between 12-25 individual cut pieces, not 250.)
Other display ideas have been thrown around that might be able to be easier to get, but all of them share a common problem- they would block my vision while sitting down, and I plan to work on paint/bead stuff while Im there as a kind of demo. But until I can sort out a display solution, there’s no point in paying a booth fee. 😦
If you know anyone who can do this at a reasonable price, btw, please send them my way. And of course, please buy stuff. I’d like to do this show, but can’t, obviously, without the booth fees and stuff.
Halloween is coming.
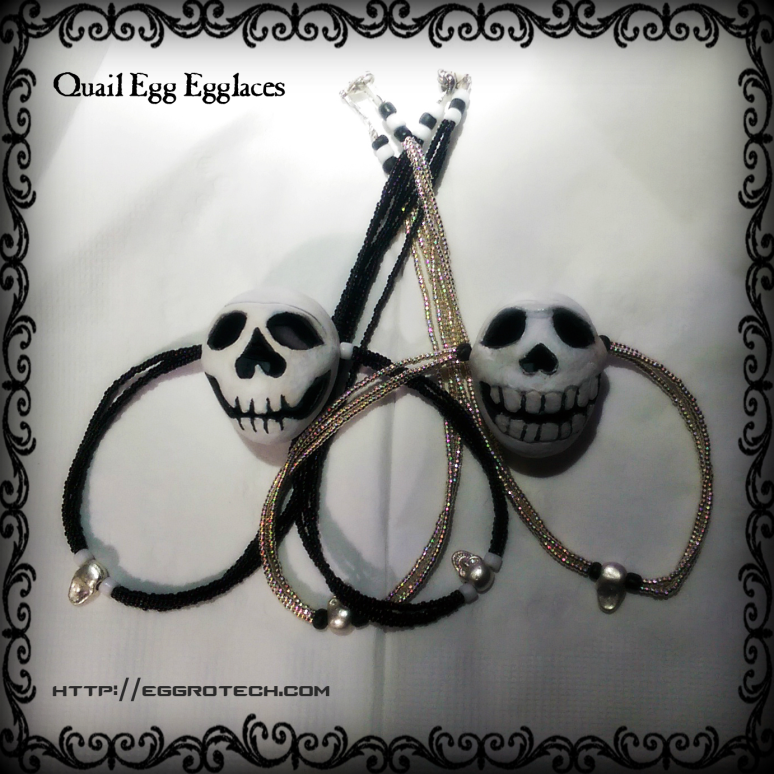
I’ve been working on so much stuff that I haven’t really posted here. I know I’m entirely terrible at media and promotion. That’s not news. However, I am good at makin stuff. I just finished these two skull egglaces (these two are sold, but I make them to order.) If you want one before Halloween though I really suggest ordering no later than October 7 as they take some time to sculpt up.
For those worried about fragility, these eggs have been coated in epoxy putty during the sculpting process on all sides. The only parts left untouched are the ones that are carved away later. So they’re much less fragile than you’d imagine. The eggs themselves have a very pale mottle to the finish (it’s not visible unless you’re looking very closely) but they are a natural product mimicking another one so that’s to be expected. I realize there’s no scale here, but these skulls are quite small- about the size of a grape tomato. They are smaller than a walnut, and the beads are the size of poppy seeds.
Im also working on some *serious* next level stuff that I’ll be showing everyone in a few days. In addition, Im looking into doing a show in December, if I can figure out a good display solution (custom cut foam solutions are not as easy to obtain as you imagine.)
In the meantime, get yourself an egglace!
Basic Patterns are now online!
The photos took me some time to edit, but now all three basic patterns are available both on the etsy store (where I included the stand because etsy is kind of a pain in the ass to customize that way) and right here on the custom order form (where you can leave the stand off if you want.)
I can turn these around very quickly, so they’re perfect for gifts for all kinds of special occasions. As a reminder, these come in at $55 (including the stand, $50 without) so they’re way more affordable than the really elaborate ones. A perfect way to start a collection!
Basic pattern set 1.
So, I’d been getting some feedback recently from people who really liked and wanted an egg (or many eggs) but just couldn’t make the price point on the ones that are truly custom. To be fair, I can understand that, just as they totally understand that the prices are based on how long they actually take me to make – there’s only so fast I can go, especially when they get really complicated.
At that point, I tried to think of a way to create a line that could come in at a lower price point in order to meet that need. I have a couple of sets like this (there’s an animal one that I’ll be talking about very soon.) but I wanted to give the heads up on this idea first.
I’ve come up with three patterns that I can do quickly, regardless of what colors people want (except black interiors. Black interiors will ALWAYS take me longer because that is how science works.) Because I can bang these designs out fast, I can offer them at a lower price point than a truly custom egg. I have the sketchwork done on all three designs (I’ll carve them out as samples tonight) but just to give a basic idea, here’s what they are. These are raw images just out of the box so you can see.
- The flower top.


In this design you have four “petals” covering the top of the egg. I can carve the “middle ring” like it is sketched here or leave that solid. Doesn’t matter. The bottom part of the egg is uncarved and can be painted.
2. The single swirl.


This is essentially the same pattern I used for “Arrakis”, only without the themed paint job. It’s a single spiral around the egg from top to bottom. The rest of the egg is painted.
3. Candy stripe.


This is the same pattern I used for the Pulse egg, just without the painstaking paint job (that rainbow gradient was challenging.) It’s two parallel swirls that go from top to bottom.
I’ve made some eggs like this in the past. Here’s some examples:


 - SOLD.")
But I can make them much more quickly now than I did years ago, so it’s possible to drop the price on these specific patterns.
Here’s how it works: though my regular prices for themed, beaded and most especially, photographic eggs will remain as they are, these *specific* patterns will be available at $50- each, plus $5 for the stand (stands aren’t included for these specific patterns automatically) and shipping (which is you know, shipping. Also, tax if you’re in New York State) If you want all three as a set, they’re $130, not including stands ($10 for 3 stands, though, so you save there too.)
You get to choose:
- Which pattern you want.
- Your interior color (one color. Black is ALWAYS $10 extra, because black is a PITA to create.)
- Your exterior colors (max of 3, please. Yes, you can choose metallic colors. That’s fine.)
- Your choice of matte or gloss finishes.
The turnaround time on these should be about 36 hours, tops, so they’re good for gifts. Yes, if you order a set you can pick different colors for each one. That’s fine. The key for me is that the patterns and paint jobs are things I can turn around quickly.
I’ll get the order form on etsy very soon, but if you want to jump on this (and I hope people jump on it, really) you can fill out one of the customization order forms, email me directly at eggrotechnyc@gmail.com or just poke me on twitter @eggrotech.
I will have animal patterns coming out in this same idea in a couple days. In the meantime- go get some of these!
Dolphin Dreams
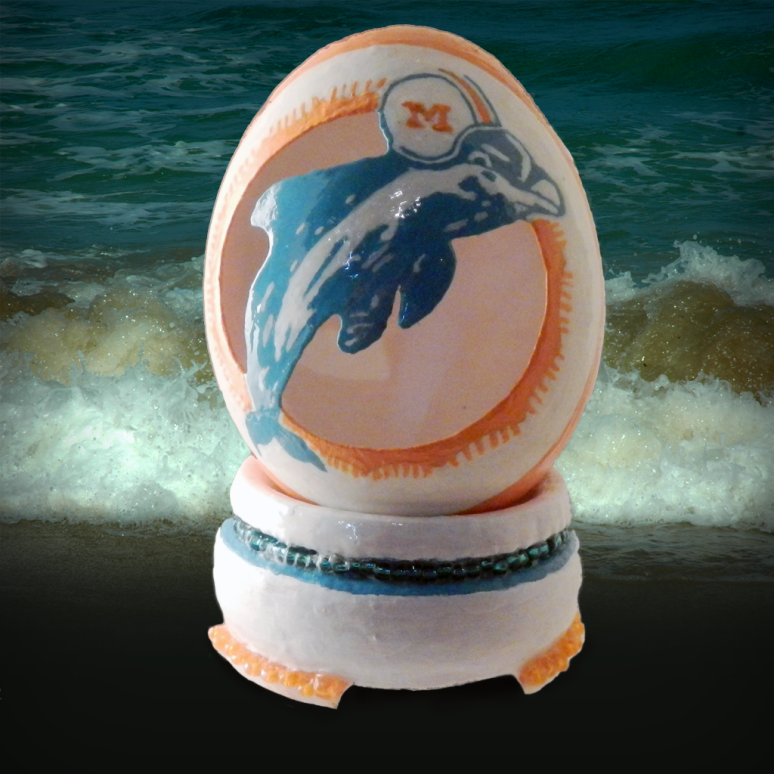
Dolphin Dreams – SOLD
A few weeks ago I was asked if I could do another sports themed egg. Different sport this time, and a slightly different kind of design. What I was asked to make as a birthday gift for someone’s mom was an egg featuring a specific version of the Miami Dolphins logo, along with an entire beaded section on the back for Dan Marino’s number (along with a lightly customized base.)
The Dolphins have changed their logo a few times. The one they’re using these days is much more graphically simplified than the one I was asked about. The biggest hassle with this was painting the tiny little orange rays around the “sun” on the front side. Since the dolphin itself bisects the circle, the carved part isn’t creating a peninsula, and is therefore much more structurally sound than some of the previous things I’ve been asked to carve. I basically carved the negative space between the “sun” and the dolphin out and left the interior white as it would be on a 2d surface.
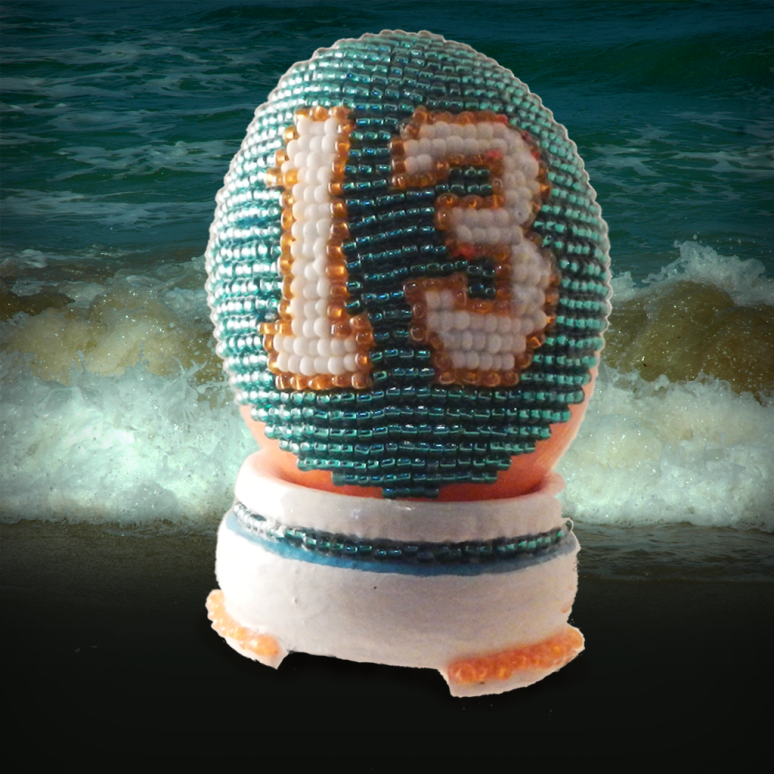
But that meant that carving the back side was not going to be a good idea, as that visual trick relies on a solid color on the inside of the egg. In this case, part of it would be a solid surface and part would be missing. So a choice had to be made as to which side of the egg would get carved and which would be left whole. It was eventually decided to bead the entire back side of the egg instead.
There are some unavoidable problems with this, and they’re worth mentioning. First of all, even if beads are technically all the same size… they’re not all the same size. In most circumstances that’s not meaningful, but at this scale those differences matter, and they can throw off an entire design. Some of the “blank spots” were filled in with modeling compound and a little paint and glue, but it’s an imperfect solution (though not immediately visible at normal viewing distances. Because of these small differences, the 3 is actually one row shorter on top than it is on the bottom- again, not really meaningful and you don’t easily notice unless you know it’s there. If I had extended it up one more row, it would have been taller than the 1, and keeping the numbers of uniform size was important. At the same time, raising the height of the 1 one more row throws it off in relation to the “point” on the 1, which by that time was already set in glue and dry. So this was the compromise position.
The other inherent issue is that it makes one side of the egg much heavier than the other side. This doesn’t matter much in terms of creating it, but it’s important when it’s displayed that it’s set properly in the stand so it doesn’t slip. In fact, a tiny piece of non-skid rubber (like a bit of one of those rubber “jar openers”) placed IN the stand wouldn’t be a bad idea either so it doesn’t slide.
Although I did take my usual six shots of this one, the sides. top and bottom are all just a plain, uncarved orange, so I’ll just show the back unless someone really wants to see the rest of it . (let me know.)
It’s good to know that all of these beads are REALLY TINY and were placed by hand with tweezers, a toothpick and a needle and thread.
If you want to commission an egg of your own, just go here and do that! (please. do that.) and there’s 11 eggs on the etsy store you can get right now, too (buy those!)
This clears my commission plate, so send some my way!
When good things go wrong.
One of the things I try to teach people about designing anything is that you cant allow yourself to become so close to an idea that you can’t toss it if it just doesn’t work. So here’s an example, and it shows why you have to just be able to rip it out and do it again.
Im halfway through another sports themed egg. The front is already done, but the back is a big beaded section with a number on it. I spent 13 full hours on it yesterday and finally got it to here:
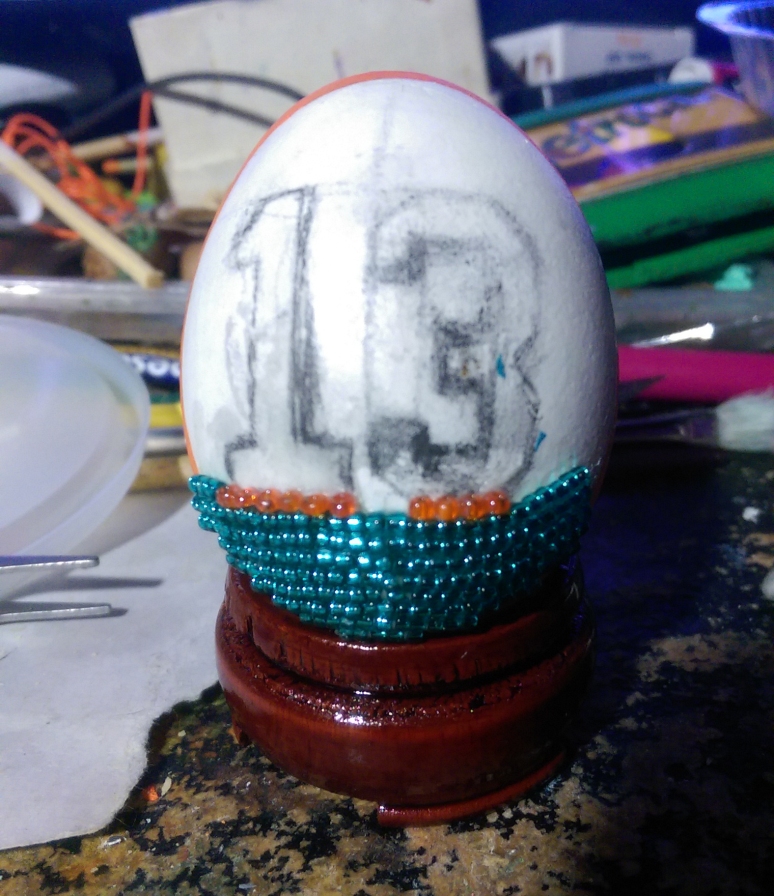
Looks fine, right? Yeah I thought so too, until I looked at it from some other angles.

My first sign something was wrong was looking at it from the bottom. It’s off center. Notice how the design on the bottom part of the egg is offset from that on the top by about 5 degrees. Instead of the lowest row being straight up from the hole, it’s offset to the left. Well, maybe it’s not that noticeable, right? Let’s check the sides.


Uh oh. That’s a problem. Im almost afraid to look at the top.

Oh, ew.
By this point all I wanted was to go to sleep. Two people assured me it wasnt worth fixing. I was in bed for ten minutes already, half awake and not wanting to throw away a full day of work.
I got up, went back to it, pulled off every last bead, and went to bed.
This morning, I redrew the back side, repainting the frame position and redrawing the numbers.
This is the top view now.

It isn’t precisely perfect, but with beads on it won’t matter. it will still line up perfectly. the numbers are centered now, too.

So I lost 13 hours of work, but when this one is done, it will be right. Do the work do it right, and do it again if you have to. Always. It will show in the finished product.
As for me, back to the beads.
Done and done.
Just a quickie this morning, but finally, ebay and paypal have finally released and sent the Pulse egg donation to Equality Florida. Why it takes this long is a mystery.

Thank you to everyone who boosted it, and of course to the generous buyer.
Next thing I have cooking is a sports related commission which I’ll start working on this week. Stay tuned.
Branching out.
So a couple weeks ago i was working on another skull egg. I was making it a bit more three dimensional than my previous ones, more sculptural and less like the calaveras I’ve done in the past. At some point I started wondering if people would like a more functional product to come out of the eggs. so I decided to see if I could work out how to make the skull into a necklace.
This was the result:


So obviously this one is a bit large (it’s a jumbo egg.), which doesn’t bother me, but might be too big for some people to feel comfortable wearing. I wore it out to a concert on Saturday night, and it didn’t survive the night, but not because of a construction or design flaw- it was that I got a bear hug from Scott Fox, the frontman for iVardensphere, and the egg got crushed against my chest. However, the front part where the skull is was (and is) still entirely intact, which tells me what I need to do to reinforce the back side so that it will be largely crushproof. However, just to be safe, I don’t guarantee safety against bear hugs from Canadian industrial musicians. Just so we’re clear.
Really, it was worth losing the necklace, but it was super instructive as to how the back needs to be reinforced in order to hold the necklace together.
Since I did manage to get it to work, Im offering the skull necklaces for sale on a custom order basis. starting at a base price of $50. They do have a lot of potential options to them so they need their own order form. As of right now Im just going to offer them here, and I’ll get to figuring out how to do them through etsy in a bit. (ETA: I have them up on Etsy also.) All you have to do is fill out this form, and I’ll email you with any questions and you can pay for them through paypal. I have fi ve sizes of egg available, and you get your choice of wire, fittings, bead and interior egg colors as well.
I really hope (more than you know) a bunch of people will snatch these up. They really do look great and each one is hand made.
Pulse Egg Update (and other stuff.)

A Pulse of Memory sold officially on Sunday morning. As the sale was through ebay, they will automatically give 100% of the proceeds to Equality Florida as soon as they release the funds. It was bought by someone in the UK, and it ships out tomorrow, provided my post office doesn’t screw up the pickup.
I want to thank everyone who boosted this, retweeted, regrammed, posted about, whatevered to try to get people to see this. Over this past weekend, which was Pride weekend in many locations, including NYC and London, it was retweeted most kindly by Sam Barnett, who plays Renfield on Penny Dreadful.

(also he seems a very, very nice person. So thank you again! So kind of you.)
I know the news is fixated right now on other things, but those folks in FL still do need help, so thank you to everyone who participated in this (especially the winner!)
I’ve been working on a sculpted egg since this egg finished, but Im going to start working on another Dune egg at the same time, because sculpted eggs take longer than just carving alone. But in the interests of showing progress, this is the sculpted one I have in process now:

Obviously it has a ways to go, but the sculpted bits will be really good for keeping the egg stable under carving stress. The back side has roses on it. But I think Im going to whip up another Dune egg real quick so it’s ready for the weekend.
As always, feel free to go check out the egglery and the etsy store, and buy things! All the things!
Giedi Prime.
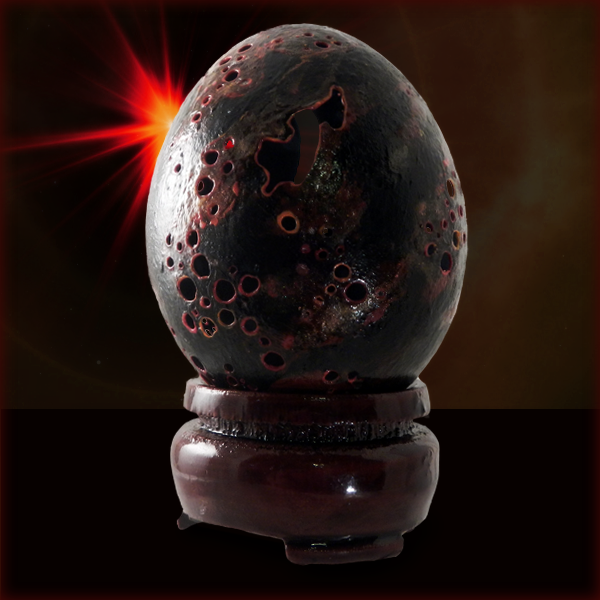
My Dune series got interrupted with the Pulse egg, WHICH IS STILL UP FOR AUCTION, GO BID ON IT AND HELP PEOPLE, but now that the auction is humming along, I was able to finish this one.
The interior is black, which I very rarely do, as black interiors make the egg inherently more fragile so there’s more risk of breakage whilst working on it. The exterior is a low sheen (not quite dead matte) black with veining and carving accents in reds and oranges, covered with a red-orange sparkly shimmer in semigloss.
The cost on this one is $100USD and it comes with the stand as shown.
There’s a lot of planets in the duniverse, and I may do another one next or switch to something else. I had an idea for a Penny Dreadful egg, but I’ll be honest, I am so very, very angry at the fiasco that was the “season finale” (which wasn’t a season finale at all.) that I don’t think I can do that one now.
I want to work on a phoenix one Ive had in my head for ages, but it’s very complex and will be beaded. I have a lot of beaded ones in the shop right now as is, so Im holding off until some of those make room.
I have 24 hours from when I blow the next batch of eggs out to decide. 🙂
Pulse of Memory Update!
So I had tried to film an update but… that didn’t go so well. So you get a post instead.
First off, I want to thank everyone who has boosted the signal so far on this. I got support from people I didn’t expect to get it from, and honestly, I’m so grateful for everyone who has retweeted it, posted it on Facebook, G+, Instagram, on their own blogs, on forums and email lists… Really, thank you.
I did have a moment I truly didn’t expect when the egg got retweeted by Andy Bell. And if you don’t know who he is, stop right now, and go look it up. I won’t lie, I ran around in my living room in a circle. Because seriously. Andy Bell.
As of right now, the egg has five bids on it and currently is sitting at $172.50USD, and has 4 watchers. Almost 1000 people have seen it. But the auction is long (I made it long to give it the most possible chance) and that means more PR, which I am admittedly terrible at(truly. Awful.). So please, keep letting people know about it. I’d love to see it hit $250.
The auction is here: http://www.ebay.com/itm/-/162106283809?
I should have another egg(a regular one) up by morning – it’s done, I just have to shoot the photos, etc.
A Pulse of Memory.

I was sitting down to start the paint work on the next Dune egg when the news came in from Orlando. A shooting in a nightclub. I went to bed before I heard much more about it but by the time I woke, 49 people were dead and I’d learned it was a gay nightclub that had been targeted.
I cried for an hour.
I then set about trying to find out if my dear friend Jordan had been killed, because he had just been in Orlando for Gay Days at Disney. (I spoke to him last night. He’s fine, just shaken up, like everyone else.)
It’s not my job to try and direct the conversation about what happened there. At the end of the day, it was not my community that was targeted. I don’t live in Florida, and I’m not gay, and I know all too well what happens when people think that “support” and “hijack” are synonymous(see: NYC 2001 for details.) But if you happen to be a member of the LGBT community and are reading this, please accept my condolences, and my deepest sympathy and love (even if I don’t know you.)
So I did what I knew how to do and made something instead. This egg, which btw looks amaaaaazing in person. It’s currently up for auction on ebay and ebay.co.uk, and all proceeds go to the Pulse Victims Fund set up by Equality Florida, other than shipping costs. The US listing is here:
http://www.ebay.com/itm/-/162106283809?
(I’m not sure what the UK listing is, but I’ll have someone in England find it and link it here.)
I’d love it if you bid on it, but even if you don’t or can’t, boosting the signal on this is just as good. Please, please, please, use all your social media wizardry and get this thing SEEN. It’s a long auction (ten days) so there’s lots of time. Tell everyone. And then tell everyone else. Facebook (I don’t facebook at all so that’s helpful), twitter, snapchat, instagram, plurk… Whatever you use, please boost the signal for this thing. The more eyes that see it, the greater the potential pool of bidders.
Here’s the egg from the usual angles.:
I’ll get back to the Dune egg now, but thanks so much everyone for making sure this one gets seen. And hug your loved ones, okay?
Arrakis.
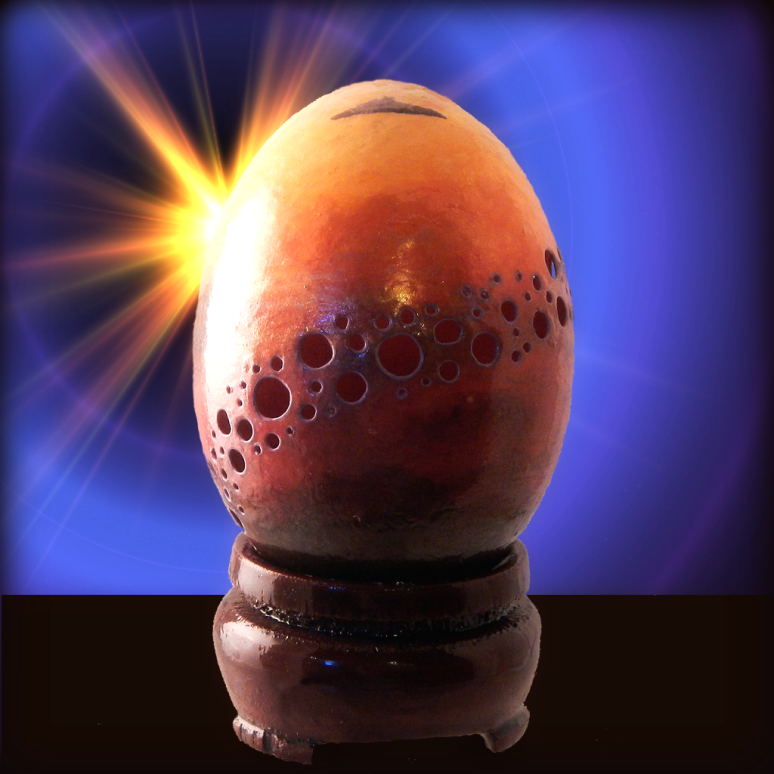 “Any road followed precisely to its end leads precisely nowhere.”
The desert planet at sunset. I’ll probably do several more in the series. This one is a jumbo egg, with a gradient interior that goes from deep red to a light yellow. The exterior is dusted with shimmering dust in purples, reds, oranges and golds, like Arrakis at sunset, the holes leading like a trail of purple smoke.
I haven’t done a swirl egg in quite some time. I’d forgotten how relaxing they are. Theoretically I should have some others out fairly quickly. This one can be taken home with the stand it’s sitting on for $75 plus shipping. Perfect for Dune fans, desert fans, and egg fans. Just probably not electric fans. That would be bad.
This one is lovely at all angles.
